"Where did that duct end up?" "What size pipe did we actually install?" "Which way did we route the conduit?"
It's closeout time, and no one can remember. The changes happened six months ago. The crew that did the work has moved on.
Now you're guessing at as-builts.
This is what happens when as-built documentation is treated as a closeout activity instead of an ongoing process.
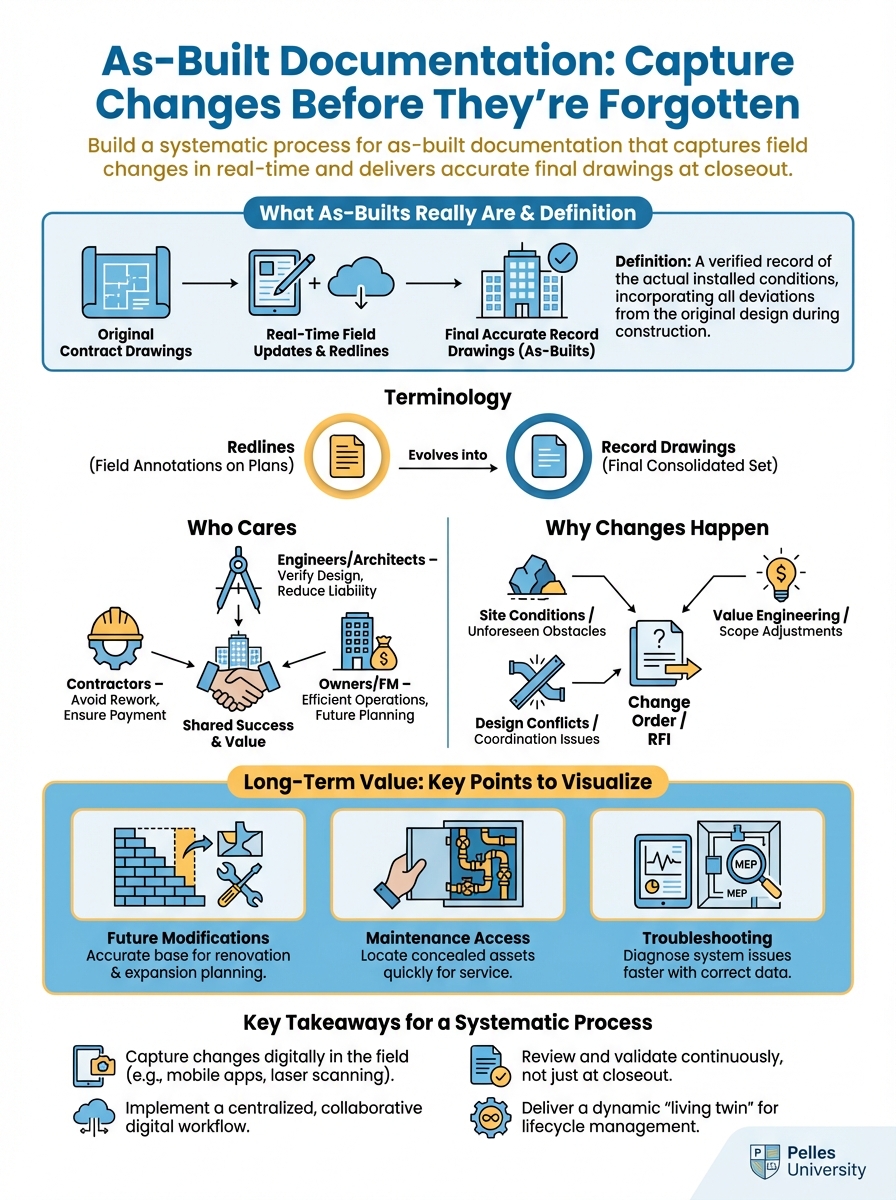
What As-Builts Really Are
Definition
As-built drawings document the actual installed conditions of your work—what was really built versus what was designed.
Design drawings: What the engineer intended As-built drawings: What you actually installed
The difference matters for:
- Future modifications
- Maintenance access
- Troubleshooting
- Code compliance verification
Terminology
As-builts: Field redline markups on design drawings showing actual conditions
Record drawings: Final CAD drawings incorporating as-built information
Redlines: The marked-up changes themselves
Some contracts use these terms interchangeably. Know what your contract requires.
Who Cares
Building owners: Need accurate documentation for maintenance and modifications
Facility teams: Use as-builts to locate equipment and routing
Future contractors: Reference as-builts when planning new work
You: May need them to defend claims or answer warranty questions
Why Changes Happen
Coordination Changes
Design conflicts resolved in the field:
- Ductwork moved for structural conflicts
- Piping rerouted around unexpected obstacles
- Equipment relocated for access
- Conduit paths changed to avoid conflicts
These rarely generate change orders but always need documentation.
Field Conditions
Reality didn't match drawings:
- Existing conditions different than shown
- Structural elements in unexpected locations
- Space tighter than designed
- Access limitations requiring different routing
Design Changes
Formal changes during construction:
- Addenda and bulletins
- RFI responses directing changes
- Change orders
- Value engineering modifications
These should already be documented but need incorporation into as-builts.
Installation Optimization
Better solutions found during installation:
- More efficient routing
- Better access provisions
- Improved coordination with other trades
- Standard practice variations
Even improvements need documentation.
The Continuous Process
Rule 1: Mark Changes Immediately
When something deviates from the drawings, mark it that day.
Not: "I'll remember and mark it later" Yes: "This changed today, I'm marking it now"
Memory fades. Details get lost. Other changes occur.
Rule 2: Keep Drawings in the Field
As-built drawings must be accessible where work happens:
Physical drawings: Clean set at the work location Digital drawings: Tablet or phone access to markup tools
If the drawings aren't there, markups won't happen.
Rule 3: Assign Responsibility
Someone must own as-built documentation:
For each crew: Foreman marks changes For the project: One person compiles and reviews
Shared responsibility often means no responsibility.
Rule 4: Review Regularly
Weekly as-built review:
- Are markups current?
- Are they clear enough to understand?
- Do they have enough dimension references?
- Are supporting photos linked?
Don't wait for closeout to discover gaps.
Marking Standards
Color Convention
Red: Additions and changes
- New routing
- Relocated equipment
- Revised dimensions
- Added components
Blue: Deletions
- Removed items
- Deleted routing
- Equipment not installed
Green: Existing/confirmed
- Highlight existing conditions to remain
- Confirm "not in contract" items
- Verify unchanged elements
Markup Techniques
Clouds: Circle changed areas with a cloud outline
Deltas: Use revision triangles to reference change documentation
Dimensions: Include actual dimensions, not just "moved"
Notes: Explain what changed and why when helpful
Cross-references: Reference RFIs, change orders, or field directives
Example Markups
Poor markup: "Duct moved"
Good markup: "Ductwork raised 12" to clear structural beam. New elevation = 9'-6" AFF. Ref: Coordination meeting 3/15/25"
The good markup tells someone exactly what was done and why.
Digital Markup Tools
If using digital as-builts:
Apps: Bluebeam, PlanGrid, Procore, Fieldwire
Standards:
- Use consistent layers/colors
- Include location stamps
- Link to photos
- Add dated comments
Backup:
- Sync regularly
- Maintain redundant copies
- Export periodically
Don't lose digital markups to app failures.
What to Document
Always Document
Location changes:
- Equipment moved from designed location
- Routing different from drawings
- Elevation changes
- Horizontal offsets
Size changes:
- Different pipe or duct sizes installed
- Equipment capacity variations
- Conductor size changes
Quantity changes:
- More or fewer items installed
- Spacing variations
- Additional access points
Configuration changes:
- Different equipment orientation
- Alternate connection methods
- Varied control arrangements
Supporting Documentation
Link to related documents:
RFIs: "Per RFI #47 response dated 3/12/25"
Change orders: "CO #12 authorized this addition"
Field directives: "FD from GC site meeting 4/1/25"
Coordination drawings: "Per approved coordination drawing CD-M-02"
Photo Documentation
Photos supplement drawings:
When to photograph:
- Before concealment (above ceilings, in walls)
- Complex routing
- Non-standard conditions
- Anything hard to describe in 2D
Photo standards:
- Include reference points (grid lines, room numbers)
- Show context, not just close-ups
- Date and label files consistently
- Link to specific drawing locations
Hidden Work
The Challenge
Work that gets covered up needs documentation before concealment:
- Piping in walls and above ceilings
- Underground work
- Equipment in inaccessible locations
- Routing through chases
Once it's hidden, documentation is your only reference.
The Process
Before concealment:
- Mark as-builts with actual installation
- Photograph the work with references
- Document dimensions to permanent features
- Have foreman verify markup accuracy
Documentation checklist:
- Routing marked on plan
- Elevations noted
- Dimensions to grid or walls
- Photos taken and linked
- Foreman sign-off
Underground Work
Special attention required:
- Depth below finished grade
- Horizontal distance to building/reference points
- Pipe or conduit size and material
- Sleeve locations and sizes
- Cleanout locations
Underground mistakes are expensive to correct.
Converting to Record Drawings
The Process
As-builts (field markups) become record drawings (final CAD):
Step 1: Collect all marked-up drawings Step 2: Compile supporting documentation Step 3: CAD technician incorporates changes Step 4: Review CAD against field markups Step 5: Verify critical dimensions Step 6: Final quality check
Who Does the CAD Work
In-house: Your CAD team incorporates changes
Design engineer: Some contracts require engineer to produce record drawings
Third party: CAD service converts markups
Know your contract: Who produces final CAD?
Quality Review
Before submission:
Completeness:
- All field markups incorporated
- All RFI-directed changes shown
- All change order scope included
- Hidden work documented
Accuracy:
- Spot-check dimensions against field
- Verify equipment locations
- Confirm routing matches installation
- Check elevation references
Format:
- Layer standards per specification
- Title block updated
- Revision marked
- File naming per requirements
Digital vs. Paper Workflows
Paper-Based Process
Field:
- Full-size prints at work location
- Redline with colored pencils/markers
- Store in protected location
- Collect weekly for compilation
Office:
- Compile marked sheets
- Scan for backup
- Forward to CAD for incorporation
Pros: No technology barriers, works everywhere Cons: Risk of loss, harder to share, scanning required
Digital Process
Field:
- Tablet or phone with drawing access
- Digital markup tools
- Real-time sync to cloud
- Photo integration
Office:
- Review markups remotely
- Export to CAD directly
- No scanning needed
Pros: Immediate visibility, no loss risk, better integration Cons: Requires devices and connectivity, learning curve
Hybrid Approach
Many projects use both:
- Digital for office review and management
- Paper backup in the field
- Periodic sync between systems
Choose based on your team's capabilities and project requirements.
Common Failures
Failure: Waiting Until Closeout
Symptom: Starting as-builts in the last month Result: Guessing at changes, missing details, inaccurate drawings Solution: Mark changes the day they happen
Failure: No Field Ownership
Symptom: No one is responsible for field markups Result: Changes undocumented, drawings not maintained Solution: Assign specific person on each crew
Failure: Generic Markups
Symptom: "Changed" without dimensions or details Result: Can't accurately produce record drawings Solution: Include dimensions, references, and explanations
Failure: Lost Documentation
Symptom: Field drawings lost, damaged, or stolen Result: Starting over, relying on memory Solution: Regular backups, protected storage, digital copies
Failure: No Review Process
Symptom: Markups accumulate unchecked Result: Discovering incomplete documentation at closeout Solution: Weekly as-built review meetings
Using AI for As-Built Documentation
Creating Standards
Create an as-built documentation procedure for an MEP contractor
that includes:

- Field markup standards
- Color coding conventions
- Required information for each type of change
- Photo documentation requirements
- Weekly review checklist

Format as a one-page field reference guide.
Describing Changes
Help me write a clear as-built note for this situation:

The design showed 4" waste pipe routing straight to the main
stack. Due to a structural beam conflict, we offset the pipe
18" to the north, dropped it 6" with a 45-degree elbow, ran
horizontally for 8 feet, then continued to the stack.

Write a clear, dimensioned note for the as-built markup.
Reviewing Completeness
Based on this change order scope, list the as-built documentation
that should be generated:

[Paste change order scope]

For each item, note:
- What drawing needs markup
- What information to include
- What supporting documentation needed
What's Next
As-built documentation feeds into the broader closeout process. Accurate as-builts, combined with O&M manuals and warranty documentation, give the owner a complete picture of what you installed and how to maintain it.
TL;DR
- Mark as-builts immediately when changes happen, not at closeout
- Use red for additions, blue for deletions, green for confirmed existing
- Include dimensions and references, not just "changed"
- Document hidden work before it's concealed with photos and dimensions
- Assign specific responsibility—shared responsibility means no one does it
- Review weekly to catch gaps before closeout