The inspector is coming Tuesday. Do you have a checklist, or are you walking the job hoping you don't miss anything?
Quality control shouldn't depend on memory. It should depend on a checklist built from the actual project requirements.
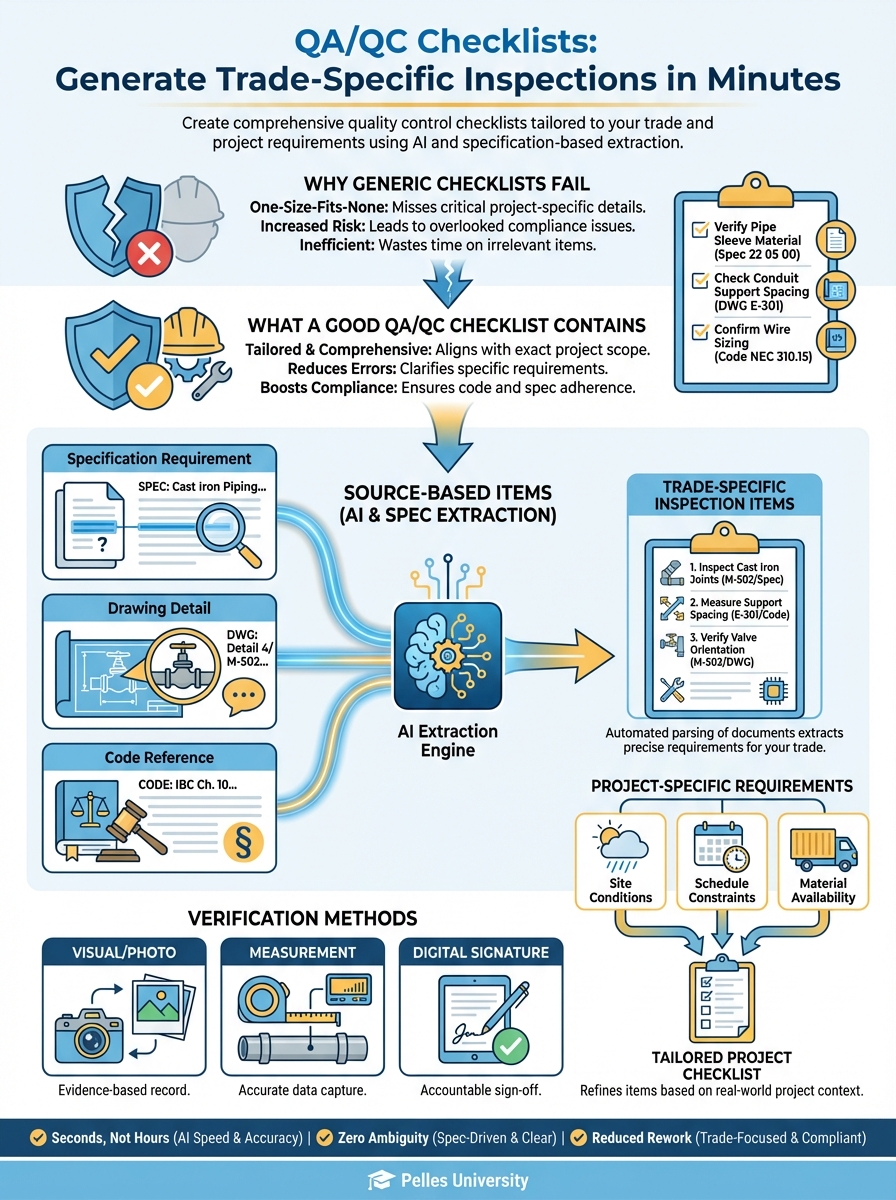
Here's how to generate trade-specific QA/QC checklists in minutes.
Why Generic Checklists Fail
Most companies use one of two approaches:
The generic checklist: Same form for every project. Doesn't match the actual specifications. Misses project-specific requirements.
The memory method: Walk the job with experienced eyes. Works until it doesn't. Can't be delegated.
Both approaches have the same problem: they're not connected to the actual contract documents.
What a Good QA/QC Checklist Contains
Source-Based Items
Every checklist item should trace back to a source:
- Specification requirement
- Drawing detail
- Code reference
- Manufacturer instruction
If you can't cite why you're checking something, why are you checking it?
Project-Specific Requirements
Generic "check for level" becomes:
- Level within 1/8" per 10' (per spec)
- Verify slope direction per drawing
- Confirm drain locations match layout
Specific items get specific results.
Verification Methods
Each item should specify how to verify:
- Visual inspection
- Measurement with tool
- Witness test
- Documentation review
Clear methods mean consistent results.
Building Checklists from Specifications
Step 1: Identify Applicable Sections
For each trade/system, identify relevant spec sections:
Ductwork Installation:
- 23 31 13 - Metal Ducts
- 23 07 13 - Duct Insulation
- 23 05 29 - Hangers and Supports
- 23 33 00 - Duct Accessories
Hydronic Piping:
- 23 21 13 - Hydronic Piping
- 23 07 19 - Piping Insulation
- 23 05 29 - Hangers and Supports
- 23 21 23 - Hydronic Pumps
Step 2: Extract Execution Requirements
Go to Part 3 of each section and extract:
- Installation requirements
- Tolerances
- Testing requirements
- Documentation requirements
Step 3: Extract Quality Requirements
Look for:
- "Quality assurance" in Part 1
- "Examination" at start of Part 3
- "Field quality control" in Part 3
- Referenced standards (SMACNA, etc.)
Step 4: Compile and Organize
Organize items by:
- Installation phase
- Location/area
- Priority (critical vs. standard)
Using AI to Generate Checklists
Speed up the process with AI extraction:
Generate a QA/QC checklist for HVAC ductwork installation based on these specifications:

[Paste relevant spec sections]

Include:
1. Pre-installation verification items
2. Installation inspection points
3. Testing requirements
4. Documentation requirements

For each item, cite the specification reference.
Format as a checklist I can print and use in the field.
Sample AI-Generated Checklist
DUCTWORK INSTALLATION QA/QC CHECKLIST
Pre-Installation:
- Shop drawings approved (23 31 13, 1.5.A)
- Duct material matches spec - galvanized steel per ASTM A653 (23 31 13, 2.1.A)
- Gauges match schedule (23 31 13, 2.1.D)
- Sealant/gaskets on site (23 31 13, 2.2)
Fabrication Verification:
- Rectangular joints per SMACNA Class A (23 31 13, 2.3.A)
- Round duct spiral seams continuous (23 31 13, 2.3.B)
- Fittings match SMACNA standards (23 31 13, 2.4)
Installation:
- Hangers per spec spacing: [X ft max] (23 05 29, 3.2.A)
- Hanger type matches spec (23 05 29, 2.1)
- Duct sealed per pressure class (23 31 13, 3.2.C)
- Access doors provided per schedule (23 33 00, 3.2)
- Fire dampers installed per drawing (23 33 46, 3.2)
Testing:
- Duct leakage test completed (23 31 13, 3.4.A)
- Test documentation submitted (23 31 13, 3.4.B)
- Leakage within [X] CFM per 100 SF (23 31 13, 3.4.C)
Trade-Specific Checklist Templates
Electrical Panel Installation
Pre-Installation:
- Panel submittal approved
- Location verified per drawing
- Wall/structure ready for mounting
- Clearances verified: [X" front], [X" sides]
Installation:
- Panel level within tolerance
- Properly secured to structure
- Grounding connected per spec
- Neutral-ground bond verified
- Knockouts not left open
Terminations:
- Wire sizing matches schedule
- Torque specifications met
- Labeling complete per code
- Directory installed and accurate
Testing:
- Megger test completed
- Ground fault circuits tested
- Arc fault circuits tested
- Documentation complete
Plumbing Rough-In
Pre-Installation:
- Drawing routing verified
- Penetration locations marked
- Sleeve sizes confirmed
- Fixture rough-in dimensions confirmed
Piping:
- Pipe material per spec
- Fittings per spec (no prohibited types)
- Slope verified: [X" per foot] drain
- Hangers per spec spacing
- Firestopping at penetrations
Testing:
- Pressure test setup ready
- Test pressure: [X PSI] for [X hours]
- Inspection scheduled
- Test documentation prepared
VAV Box Installation
Pre-Installation:
- Unit matches schedule
- Capacity verified
- Controller matches spec
- Access location confirmed
Mounting:
- Level and secure
- Clearance for access
- Duct connections proper
- Insulation continuous
Connections:
- Hot water piping connected (if applicable)
- Electrical power connected
- Controls wired per diagram
- Damper operation verified
Startup:
- Actuator calibrated
- Airflow measured
- Controls commissioned
- Documentation complete
Phased Checklists
Organize checklists by project phase:
Phase 1: Rough-In
- Routing and locations
- Hangers and supports
- Sleeves and penetrations
- Before cover-up items
Phase 2: Equipment Setting
- Equipment placement
- Connections
- Leveling and anchoring
- Access verification
Phase 3: Trim and Finish
- Fixtures and devices
- Labeling
- Final connections
- Appearance
Phase 4: Testing and Commissioning
- System tests
- Documentation
- Witness inspections
- Deficiency correction
Making Checklists Actually Work
Keep It Visible
Checklists in the office don't help the field. Make them:
- Printed and on clipboards
- Mobile-accessible
- Posted at work areas
Daily Use, Not Weekly
Checklists work when used daily:
- Pre-work check
- During work verification
- End-of-day confirmation
Waiting until inspection time defeats the purpose.
Document Results
Every checklist should capture:
- Date completed
- Who verified
- Pass/fail status
- Notes on deficiencies
This creates the quality record you need.
Address Failures Immediately
When items fail:
- Note the deficiency
- Assign correction
- Re-inspect after correction
- Document resolution
Punch list items should come from checklists, not surprises.
The Weekly QC Review
Build QA/QC into your weekly rhythm:
Monday: Review week's planned work, prepare relevant checklists
Daily: Use checklists during installation
Friday: Review completed checklists, note patterns, prepare for next week
Pattern Recognition
Track failures over time:
- What items fail repeatedly?
- Which crews have issues?
- What specs cause confusion?
Patterns indicate training needs or process problems.
AI-Generated vs. Template Checklists
When to Generate Fresh
- New project with unique specs
- Unfamiliar equipment
- Complex systems
- High-stakes inspections
When to Use Templates
- Standard installations
- Repeat project types
- Common equipment
- Routine inspections
The Hybrid Approach
Start with a template, then:
- Run AI extraction on project specs
- Compare to template
- Add project-specific items
- Remove non-applicable items
- Update spec references
Best of both worlds: proven structure plus project specificity.
What's Next
QA/QC checklists catch issues during installation. The next step is building punch list workflows—so the issues you do find get tracked and resolved systematically.
TL;DR
- Generic checklists miss project-specific requirements—build from actual specs
- Use AI to extract requirements from specification sections in minutes
- Organize by phase: rough-in, equipment, trim, commissioning
- Use checklists daily, not just before inspections
- Track failure patterns to identify training needs and process improvements